Wednesday, March 28, 2012

These feet were made for walking

they were half orange (and
March is MS Awareness month

Mom, Nancy, was diagnosed with Multiple Sclerosis in the early 60's.  Back then there wasn't much hope for a cure much less for a fulfilling life.  I believe that the doctor that determined that mom had MS told her that she probably wouldn't live to see her children grow up.  That's a pretty rough sentence to hand out  to a young (29) mother of 4 small children.  However, Nancy didn't roll over and give up, she fought tooth and nail to beat this disease.  Mom not only saw all of her children grow up to adulthood, she saw her granddaughters do the same.  

From this, I learned to never give up. Mom didn't have to say those words, she lived those words.

MS Research has brought some wonderful medications that help the modern day patient cope with this devastating disease. I met a woman on the MS Challenge walk that has made a turn around from using a cane and walker to now walking independently.  That doesn't mean that the meds work for everyone.  As I've found out, there are so many variations in where MS attacks the body (ruining the nerves outer layer) that the medications are not a one size fits all solution.  More research is needed, and for this I walk.  I walk in the annual Spring MS Walk and for the past 3 years I have joined the annual Fall MS Challenge Walk (50 miles, 3 days)  in beautiful Door County Wisconsin.  This year, all 3 of my daughters are planning on joining me.

We've started training.  Training to walk?  I know, I didn't think you had to either.  Until I participated in my first 15 mile walk back in 1986.  Right about mile 7, my feet started talking to me.  I finished that walk, but had to put lots of Band-Aids on when I was done.  We start out slow, usually 1-2 miles a day, and build up to 3-4 miles every other day.  Weekends are made for power walking, I try to get in 6-10 miles at a stretch when we get closer to Challenge Walk time, which is in late September.  I'll post our progress.

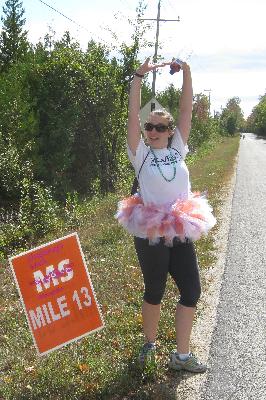
This is my oldest daughter at mile 13, her lucky number, last year.  Day one was a beautiful Fall day.
click on me


Tuesday, March 27, 2012

Lil Red Riding Hood

link to purchase from Etsy (no affiliation)
Mom had two books that I read over and over again.  One was a collection of Mother Goose stories and the other was a collection of fairy tales, it was similar to the  one pictured above.  .

One of my favorites was the story of Little Red Riding Hood, I remember reading out load, using different voices for the characters.

When I happened upon this pattern, I had to make it.
I found the pattern on Ravelry and substituted Cascade Cherub Aran for the Berroco Lustra yarn.  It worked up really fast (two strands at once) and SOFT.

You can also go directly to the pattern source, Petite Purls  I highly recommend this site, so many cool patterns~mpr


Monday, March 26, 2012

Flowers flowers flowers

I am working on making fabric flowers to add to my revamped MS Challenge walk t-shirt into a bag project. I used to make ribbon roses many moons ago, so the idea isn't foreign to me.

You can find tons of tutorials

http://fiftieswedding.com/diy-flowers-ribbon-flower-tutorial/

Or click on this link and you might even win a cute headband.

More later~mpr

Saturday, March 24, 2012

Knitty Kitty

Did I tell you that I am a craftaholic?  I love to stop @Joanne Fabrics and they are on my way home, how convenient!  One of my sisters frequently calls my cell phone right about theime I should be getting home.  If I don't answer she leaves a message and it goes like this "Step away from the fabric, you have enough at home.  Put that yarn back on the shelf, use what you have at home before you buy any more.  You can do it, one foot in front of the other, leave Joanne's and go home...without buying anything!"

Fine, I'll only stop if I am out of something I need.  I will buy just what I need (unless there's a really good sale and I have a coupon on top of that...hee hee).

Here's a picture of a completed project. Yay!

I found this pattern on Ravelry.  I would like to thank Ravelry for helping support my knitting addiction with excellent pattern selections, tips and tons of other yarn related support.   Check them out.  You can find the free pattern for this hat here
One more thing about Ravelry...it's free! 

Here's another shot of the same pattern along with a free pattern that I developed (are you ready for some football?)~mpr


Thursday, March 22, 2012

Gardening in March?


What is going on with this weather?  I heard on the radio this morning that 4 years ago we had a record snow storm of 15 inches on March 21.  I think we hit 80 degrees here yesterday.  This is Wisconsin people, we are supposed to be bundled up in our parkas until May.

I even thought about planting yesterday.  That's crazy, but I might sprinkle some wild flower seeds I have hanging around just to see what happens.

Here's a gardening tip from Nancy:
I like to plant using my hands sans gloves.  To keep the dirt from lodging under your fingernails, rub you nails across a bar of soap before you go out to plant. You might have to run some water over the bar of soap first, the idea is to get the soap lodged under your nails so the dirt won't.   It will feel weird at first, but your fingernail cleanup will be eliminated.  ~mpr


I've already started my Spring clean up, you can get some valuable tips here


Wednesday, March 21, 2012

Teachers will PAY to wear jeans!

As a fundraising effort to fund our MS walk this year, I asked my admins. if I could have a staff jean day to raise some funds and awareness for MS. They granted my wish and today my staff pooled together $284 just to wear jeans! A good majority of my staff also wore orange to further show their support. I got choked up a few times today as I thanked my coworkers for wearing jeans. I really am lucky to be a part of the MAS family! ~eem

Down Syndrome Day 3.21

Today is Down Syndrome Day, celebrating the 3rd copy of the 21st chromosome.  Ten years ago my oldest daughter worked at a summer camp where kids and adults with Down Syndrome could attend.  It was a great experience for her, one that she will never forget.  Working at the camp helped shape her outlook on life.  A few years later she met a single father, raising his son with Downs Syndrome on his own.  They started dating and are now married.  I got a grandson in the deal...nice!  I learn so much from our little guy.  He's really just like any other kid, only sweeter (okay, I may be biased).

Check out what they did in Italy today...Eccelente!

http://www.fastcocreate.com/1680265/world-down-syndrome-day-ad-campaign-puts-new-faces-in-familiar-places
~mpr


Tuesday, March 20, 2012

Crayon Rolls

I made some crayon rolls a few months ago, two of my daughters are teachers and use them for their table groupings.  I found the pattern from The Pleat and Poppy through a link on Pinterest to make crayon rolls for 16 crayons.  They were easy to whip up, I think I made 20 when it was all said and done.  I cut the pattern length in half for some of the rolls.  Mine looked similar to the one shown below, you can click on the link to go to an Etsy store if you want to purchase one.


Check out this blog give away:  http://bloggingbusinessartisans.blogspot.com/2012/03/march-giveaway-crayon-roll-and-coaster.html, for a chance to win a really cool crayon roll.
~mpr

Monday, March 19, 2012

Easter Treats

This year I'm going to make peanut butter eggs, like  these from Reader's Digest.  I've been making mini peanut butter cups for years, ,it's pretty much the same recipe.  I prefer to use bulk chocolate instead of bagged chips, either way they turn out great.

Cake pops would be fun too, I found these on About.com/candy

This easter bunny cake would be fun too, from Betty Crocker


The "bunny"  used to hide our easter basket, it was always fun running around the house trying to find it, but we couldn't have any until we came home from church.   Mom used to make the 3 girls matching dresses for Easter church service and then we would pile into the car for a trip to our grandparents.


We used to dye our eggs using food coloring and vinegar to set the color.  You can use crayons to create a design that the dye won't affect.  It's fun to think up different patterns.

You can also create your own dye colors using organic materials like veggies and spices.  .  Red onion skin makes a beautiful purple.  Here's what you need to do.

  • Place the eggs in a single layer in a pan. add water to cover.
  • Add one teaspoon of vinegar.
  • Add the natural dye. Use more dye material for more eggs or for a more intense color.
  • Bring water to a boil.
  • Reduce heat and simmer for 15 minutes.
  • If you are pleased with the color, remove the eggs from the liquid.
  • If you want more intensely colored eggs, temporarily remove the eggs from the liquid. Strain the dye through a coffee filter (unless you want speckled eggs). Cover the eggs with the filtered dye and let them remain in the refrigerator overnight.
  • Sunday, March 18, 2012

    Road Trip


    Sing "She'll be coming around the mountain" to the tune of "Row row row your boat".  That's one of the ways mom kept us entertained on long trips. We didn't really listen to the radio, maybe because dad would've had to keep looking for stations, maybe because there was already too much noise in the car with 4 kids, maybe because the sounds of our voices was the best music to my parents ear.  I kind of feel sorry for families that plug in DVD players with headphones firmly intact on their kids heads, they are missing out on some great bonding time. 

    Take off the headphones and play some car games.
    Search the web, you can find tons of ideas.
    This site has some free printables for highway bingo
    Make your own  bingo cards or tic tac toe cards, using state license plates to create the match.


    Play the ABC game, using the bill boards along the roadway, each person (or team) finds words in a sign that contain the letter A, then B, then C...you get the drift.  The person calling out the letter has tell the others what word they found with the letter in it.  A in Appleton, B in Cranberry, etc.  They can use the same word for as many letters as they can sequentially.  Let's say there's a sign for Cranberries.  A in Cranberries, B in Cranberries, C in Cranberries.  The other players cannot use the same letter in the same word.  For our example, the first one using the A in Cranberries has claimed that A and no one else can use it. First one tofind the Z wins.  For variety,  you can go backwards from Z to A, or to extend the game, get to Z, turn around and go back to A.  In our version of this game we do now allow words on moving vehicles 


    Another family favorite is counting cows, this doesn't work everywhere, but in rural America it works out pretty good.  We use teams for this game, each side of the car forms a team. Each grouping of cattle equals one cow.   If you see cattle on your side of the road, you say "I have one cow".   The team that has the most cows by the end of the trip is the winner.  However, you can lose cows.  If you pass a graveyard, the team on that side of the car loses ALL of their cows.  The other team, has to call it "You lost all of your cows, graveyard", at least that's how we do it. -mpr

    You'll build some great memories!
    What's your favorite road trip game?


    Saturday, March 17, 2012

    A slight delay in my plans

    I think we got about this close right before I got bopped in the eye
    I had a little accident, my eye ran into one of the puppy's paws, or was it the other way around. Anyway, after a sleepless night (I am not complaining, just explaining) I headed over to the eye doctor's to make sure I wasn't going to mess up my vision. Good thing I did, they cleaned out my eye, I have an corneal abrasion =scratch on my eye, and fixed me up with a bandaid. What? A bandaid on your eye you say? That's right, they put some meds in my eye and then sealed it up with a clear contact. Immediate relief!

    I started back on my crafting today, recycling old MS WALK and MS  BDBT (bike tour) tees.  I can't wait to get some photos up and show you my craftiness. 


    I just found this excellent blog, fun ideas and instructionals too.  There is a promotion for a new allergy relief medicine there, Similasan ,  and if you  checkk them out and submit a comment  maybe just maybe win a $100 Visa card.  Good luck, or as we say in our household GLUCK...mpr

    http://www.mesewcrazy.com/


    Tuesday, March 13, 2012

    Play ball

    We are Brewer fans in our house, can't wait for opening day, April 6, 2012.  I took the day off from work, whoo hoo! 

    Here's a photo of the necklace my daughter made me last year, in Brewer colors of course.
    Instructions to make your own are on Ravelry...click here to get there

    You can make the necklace in whatever colors you want, like this multi colored one:


    Monday, March 12, 2012

    Snappy St. Patty's Day Shirts

    My son, "D", loves to sport a new St. Patty's day shirt each year, sometimes he even gets away with wearing them year round as he has begun to style himself.  I am always disappointed with the lack of St. Patty's day shirts at a particular "red donut" store in the boys section.  They have TONS in womens', girls' and mens' but almost nothing for the boys.  Last year I was lucky enough to find an appropriate one in the mens' section, not this year, all dealing with some sort of BOOZE.  So I was bummed that my little guy wouldn't be sporting something funky and green.  Until I came across two ties in the dollar section.  One, I was going to try and make into a funky tie necklace for myself, epic fail, and the other I tried to convince my husband into thinking "D" would wear it as an actual tie.  Instead I decided to turn the two ties into a snap on tie and here is the finished result.


    I made them by tying the tie around my neck, I had to watch a youtube video to figure it, then I had my mom carefully cut the tie off of me, as to keep the knot together.

    I secured the knot with some fabric glue and let it dry over night.  The next day, I pinned the ties in place onto matching polo shirts.

    Once pinned in place, I lined up two pins, one on the tie and one on the polo as markers of wear to sew my snaps.

     Remove the pins that held the pin onto the shirt, leaving my marker pins in place.  Next , sew the snaps onto the ties and the shirts.

    Here are the snaps sewn onto the the more "Kelly green" shirt.


    You can see that the two halves of the tie, don't quite meet up with one another and that's okay.  Everything is hidden by the collar of the polo shirt.

    Originally my mom and I brainstormed about making the ties a permanent fixture on the shirts, but this way, he can wear the shirts with or without the ties year round.

    ~eem

    ps: oy!  mom!  I changed the font cause it was hard to read...

    Friday, March 9, 2012

    Pillow Dress (part 2)

    It's time to add the bias tape to the armholes.  I like to make my own.   There are some great videos on You Tube or you can click this link for a nice tutorial, or buy some pre-made at the fabric store.

    Pin Carefully along the corner, then sew along the center fold line

    I used the coordinating micro dot white on white for my toddler dress and some left over white on red polka dots for my infant dress.  I found that a 2 inch x width of the fabric was plenty of material for the armholes.  After you've sewn the binding to the inside, flip it over and sew to the outside.  Make sure you cover the stitching from the last step.


    Fold and press the neckine down, right side to the inside,  (both sides) 1/4 inch.  I like to sew a zig zag stitch to keep the fabric from fraying.

    Then fold the neckline down 1 inch, right side to the inside.  Sew close to your previous seam.  You now have a nice finished casing for the ties.


    I made two ties, one for the front and another for the back.  This is the 2nd little twist to our dress.

    Using the width of the fabric, I used the white on white micro dots, cut two 4 inch strips.
    Fold and press 1/4 inch (right side to inside)

    Here's our twist on making the tie.  We're NOT going to sew down the long length.
    Instead, we're going to put the right sides together and sew a 1/4 inch seam on both of the short ends.
    Clip your corners and trim your seam.
    Right sides facing, edge turned in 1/4 inch


    Turn so wrong sides are facing and push out those corners.

    Press, Press, Press.

    Sew a 1/8 inch seam around the entire tie, enclosing the previously pressed 1/4 inch edge.
    finished tie, kind of blurry
    Repeat for the 2nd tie. 

    Using a large safety pin, pull the ties through the neck casing.

    Whew!  Almost done.  

    We just have to add a ruffle and embellishment and we're done.

    I made two ruffles for my toddler dress.
    Cut two (2)  3 inch width of your fabric
    Cut two (2)  5 inch width of your fabric

    I made one ruffle for the infant dress
    Cut two (2) 5 inch width of your fabric

     Employing the same method as found in the how to make bias tape tutorial, I joined two strips and then cut that to your desired length (65 inches for me)

    Fold and press a 1/4 inch width the entire length of your ruffle material, pressing the right side over to the wrong side. I like to minimize the raw edges, so I folded this over again and pressed.  Sew 1/8 inch from edge.  This is the bottom of your ruffle. 

    No need to finish the other edge, we are going to sew it to the raw edge of the dress in just a minutes.

    Gather that fabric:
    I used dental floss to help me ruffle the fabric.  You do this by zig zagging over the dental floss and using the dental floss to pull the fabric into a ruffle.  

    Sew your ruffled edge to the bottom length of your dress 1/4 inch seam,  wrong sides together (yes we are doing another french seam).  Turn so wrong sides are together and sew a 1/2 inch seam.
    French seam prior to turn


    I added a pocket to the toddler dress and  an  applique for the infant dress.


    Thursday, March 8, 2012

    My spin on the pillow dress (part 1)


    I'm in love with the pillow dress.  Not only is it easy to whip up, it's easy to change it up and make it your own.  I found this tutorial a few weeks ago and was off and running (to the fabric store).

    One of my nieces has a darling 3 year old that loves to wear her Minnie Mouse costume dress.  It's getting a little worn, so I thought I'd make her a new one using the pillow dress as a base.  She has a little sister that's one years old and I'm making a version for her too.

    Here's what you need for the two dresses.
    1  yard of main color  (red with white polka dots)
    1/2 yard of accent color (white on white micro dots)
    1/2 yard of accent color (black with white micro dots)
    matching thread
    ribbon for embellishment
    dental floss (that'll come in handy for making the ruffle)
    iron
    ironing board
    enthusiasm


    First step...wash all fabrics.  This takes out the sizing and if your material is going to shrink (mine was cotton= shrink) you'll take care of that too.  

    Next you'll want to measure and cut your main fabric.  My 3 year old great niece is on the tiny side, so I cut the length for her dress to 19 inches and her baby sister is average size, so I cut the length to 16 inches for her dress.   If you have the child that you're making this for handy, hold up the material to her neckline and determine the length based on where you want the hem to hit her leg.   

    Long story short:  cut length for dress 19 inches for 3 year old, 16 inches for 1 year old.  

    The next thing you're going to want to do is cut the armholes.  

    I did this by turning the material so the right sides (outside) are facing each other. 

    Draw your armholes. For the 3 year old dress,  I made a mark at 2 inches in from the folded side and 5 inches down. 

    Important note:  I didn't cut the folded edge.  I figured it didn't make any sense to cut something and then sew it back together again.  This is my first little twist to the average pillow dress pattern. 

    I used a small rule to draw my line from the top down 4 inches and then in from the side, 1 inch and then freestyle drew the curve to join the two straight lines. 

    Cut away!

    The next step is also a cheater step.  Fold this edge over to the other side and use this cut out as the pattern for the other side. 

    Cut away!

    Next step, sew the seams.  I know, I said seams, but there is only one raw edge.  You do need to sew in one inch on the folded edge to keep the dress symmetrical.   I made a french seam on the raw edge. 

    Okay, let's get that french seam in. 

    You need to turn your fabric so the wrong (inside) sides are facing.  You're pretty outsides are facing out.  

    Sew a 1/4 inch seam down the raw edge side.
    Turn the material so the right sides are facing.
    Press...I can't stress this enough.  I think I spend more time ironing than sewing when I'm making something. 

    Sew a 1/2 inch seam down this side.  This seam will encase the 1/4 inch seam you just finished.  

    french seam
    If you haven't sewn the 1 inch seam on the other side to make all sides equal, do that now. 


    Wednesday, March 7, 2012

    Nancy at 17

    This is Nancy at 17, just thought you'd like to see one of my favorite photos of mom.

    Nancy grew up in a very small town in central Illinois. I'm pretty sure her extended family made up a large portion of the population. I have fond memories of visiting mom's hometown, most of mom's family were dairy farmers back then. I loved all of the farm cats and dogs and helping with chores. We didn't have time to sit around watching t.v. and there was no internet or gaming back then. Kids played outside when weather was good from dawn til dusk. When it was crummy out we would play board games or have a pretend beauty pagent. My brother was always the host and my sisters and I would take great pains in practicing for the talent portion. One of my favorite memories was when my sisters and I lip synced (and played pretend saxaphones) to Count Basie songs...let it roll Mr. Basie (one more time). If we said we were bored, the standard come back from my mother was "read a book", that's probably why I am an avid reader. Thanks mom~mpr


    Posted by Picasa

    Monday, March 5, 2012

    Brownie Redo

    Total success and worth remaking! I left out the Reese's pieces candy though... I don't care for them, and thought while it may add a texture element, they are too sweet. So glad that I remade them and didn't get upset about the first batch. I guess I was channeling grandma a little more than usual yesterday. Now I need to motivate myself to get back to knitting hat orders before I fall behind. I am going to try and make a lamb ear flap hat. -eem

    Here's a tip...this recipe requires melting milk chocolate chips and then blending the chocolate with heavy cream.  Use electric mixer and if the result has a cottage cheese texture, add a little more heavy cream, 1 tablespoon will usually do the trick-mpr


    Sunday, March 4, 2012

    Brownies and naughty dogs

    Izzy and Abe

    Helping mom put together a tutorial for a pillowcase dress. The fabric she picked out will be similar to a familiar female mouse icon. It will hopefully replace the worn out dress my 3yr old little cousin refuses to take off. While helping my mother take notes and pictures, I battled her naughty dogs and left brownies in the oven at home for my husband to take out. Well, he fell asleep and luckily didn't burn down the house, but the brownies are so bad that even grandpa Chuck wouldn't eat them. Oh well, all in a day of lessons learned! Hopefully you will learn a more crafty lesson from our upcoming tutorial. Until then, I am off to fend off the naughty spaniels and remake the brownies when I get home, cause darn it, I was looking forward to them. HA! Here is a link to the brownies that I will remaking so you see why they are worth redoing. Enjoy! eem