Tuesday, March 13, 2012

Play ball

We are Brewer fans in our house, can't wait for opening day, April 6, 2012.  I took the day off from work, whoo hoo! 

Here's a photo of the necklace my daughter made me last year, in Brewer colors of course.
Instructions to make your own are on Ravelry...click here to get there

You can make the necklace in whatever colors you want, like this multi colored one:


Monday, March 12, 2012

Snappy St. Patty's Day Shirts

My son, "D", loves to sport a new St. Patty's day shirt each year, sometimes he even gets away with wearing them year round as he has begun to style himself.  I am always disappointed with the lack of St. Patty's day shirts at a particular "red donut" store in the boys section.  They have TONS in womens', girls' and mens' but almost nothing for the boys.  Last year I was lucky enough to find an appropriate one in the mens' section, not this year, all dealing with some sort of BOOZE.  So I was bummed that my little guy wouldn't be sporting something funky and green.  Until I came across two ties in the dollar section.  One, I was going to try and make into a funky tie necklace for myself, epic fail, and the other I tried to convince my husband into thinking "D" would wear it as an actual tie.  Instead I decided to turn the two ties into a snap on tie and here is the finished result.


I made them by tying the tie around my neck, I had to watch a youtube video to figure it, then I had my mom carefully cut the tie off of me, as to keep the knot together.

I secured the knot with some fabric glue and let it dry over night.  The next day, I pinned the ties in place onto matching polo shirts.

Once pinned in place, I lined up two pins, one on the tie and one on the polo as markers of wear to sew my snaps.

 Remove the pins that held the pin onto the shirt, leaving my marker pins in place.  Next , sew the snaps onto the ties and the shirts.

Here are the snaps sewn onto the the more "Kelly green" shirt.


You can see that the two halves of the tie, don't quite meet up with one another and that's okay.  Everything is hidden by the collar of the polo shirt.

Originally my mom and I brainstormed about making the ties a permanent fixture on the shirts, but this way, he can wear the shirts with or without the ties year round.

~eem

ps: oy!  mom!  I changed the font cause it was hard to read...

Friday, March 9, 2012

Pillow Dress (part 2)

It's time to add the bias tape to the armholes.  I like to make my own.   There are some great videos on You Tube or you can click this link for a nice tutorial, or buy some pre-made at the fabric store.

Pin Carefully along the corner, then sew along the center fold line

I used the coordinating micro dot white on white for my toddler dress and some left over white on red polka dots for my infant dress.  I found that a 2 inch x width of the fabric was plenty of material for the armholes.  After you've sewn the binding to the inside, flip it over and sew to the outside.  Make sure you cover the stitching from the last step.


Fold and press the neckine down, right side to the inside,  (both sides) 1/4 inch.  I like to sew a zig zag stitch to keep the fabric from fraying.

Then fold the neckline down 1 inch, right side to the inside.  Sew close to your previous seam.  You now have a nice finished casing for the ties.


I made two ties, one for the front and another for the back.  This is the 2nd little twist to our dress.

Using the width of the fabric, I used the white on white micro dots, cut two 4 inch strips.
Fold and press 1/4 inch (right side to inside)

Here's our twist on making the tie.  We're NOT going to sew down the long length.
Instead, we're going to put the right sides together and sew a 1/4 inch seam on both of the short ends.
Clip your corners and trim your seam.
Right sides facing, edge turned in 1/4 inch


Turn so wrong sides are facing and push out those corners.

Press, Press, Press.

Sew a 1/8 inch seam around the entire tie, enclosing the previously pressed 1/4 inch edge.
finished tie, kind of blurry
Repeat for the 2nd tie. 

Using a large safety pin, pull the ties through the neck casing.

Whew!  Almost done.  

We just have to add a ruffle and embellishment and we're done.

I made two ruffles for my toddler dress.
Cut two (2)  3 inch width of your fabric
Cut two (2)  5 inch width of your fabric

I made one ruffle for the infant dress
Cut two (2) 5 inch width of your fabric

 Employing the same method as found in the how to make bias tape tutorial, I joined two strips and then cut that to your desired length (65 inches for me)

Fold and press a 1/4 inch width the entire length of your ruffle material, pressing the right side over to the wrong side. I like to minimize the raw edges, so I folded this over again and pressed.  Sew 1/8 inch from edge.  This is the bottom of your ruffle. 

No need to finish the other edge, we are going to sew it to the raw edge of the dress in just a minutes.

Gather that fabric:
I used dental floss to help me ruffle the fabric.  You do this by zig zagging over the dental floss and using the dental floss to pull the fabric into a ruffle.  

Sew your ruffled edge to the bottom length of your dress 1/4 inch seam,  wrong sides together (yes we are doing another french seam).  Turn so wrong sides are together and sew a 1/2 inch seam.
French seam prior to turn


I added a pocket to the toddler dress and  an  applique for the infant dress.


Thursday, March 8, 2012

My spin on the pillow dress (part 1)


I'm in love with the pillow dress.  Not only is it easy to whip up, it's easy to change it up and make it your own.  I found this tutorial a few weeks ago and was off and running (to the fabric store).

One of my nieces has a darling 3 year old that loves to wear her Minnie Mouse costume dress.  It's getting a little worn, so I thought I'd make her a new one using the pillow dress as a base.  She has a little sister that's one years old and I'm making a version for her too.

Here's what you need for the two dresses.
1  yard of main color  (red with white polka dots)
1/2 yard of accent color (white on white micro dots)
1/2 yard of accent color (black with white micro dots)
matching thread
ribbon for embellishment
dental floss (that'll come in handy for making the ruffle)
iron
ironing board
enthusiasm


First step...wash all fabrics.  This takes out the sizing and if your material is going to shrink (mine was cotton= shrink) you'll take care of that too.  

Next you'll want to measure and cut your main fabric.  My 3 year old great niece is on the tiny side, so I cut the length for her dress to 19 inches and her baby sister is average size, so I cut the length to 16 inches for her dress.   If you have the child that you're making this for handy, hold up the material to her neckline and determine the length based on where you want the hem to hit her leg.   

Long story short:  cut length for dress 19 inches for 3 year old, 16 inches for 1 year old.  

The next thing you're going to want to do is cut the armholes.  

I did this by turning the material so the right sides (outside) are facing each other. 

Draw your armholes. For the 3 year old dress,  I made a mark at 2 inches in from the folded side and 5 inches down. 

Important note:  I didn't cut the folded edge.  I figured it didn't make any sense to cut something and then sew it back together again.  This is my first little twist to the average pillow dress pattern. 

I used a small rule to draw my line from the top down 4 inches and then in from the side, 1 inch and then freestyle drew the curve to join the two straight lines. 

Cut away!

The next step is also a cheater step.  Fold this edge over to the other side and use this cut out as the pattern for the other side. 

Cut away!

Next step, sew the seams.  I know, I said seams, but there is only one raw edge.  You do need to sew in one inch on the folded edge to keep the dress symmetrical.   I made a french seam on the raw edge. 

Okay, let's get that french seam in. 

You need to turn your fabric so the wrong (inside) sides are facing.  You're pretty outsides are facing out.  

Sew a 1/4 inch seam down the raw edge side.
Turn the material so the right sides are facing.
Press...I can't stress this enough.  I think I spend more time ironing than sewing when I'm making something. 

Sew a 1/2 inch seam down this side.  This seam will encase the 1/4 inch seam you just finished.  
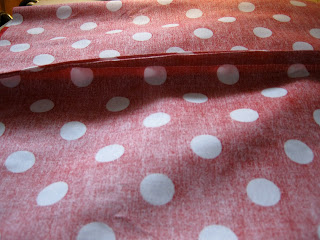
french seam
If you haven't sewn the 1 inch seam on the other side to make all sides equal, do that now. 


Wednesday, March 7, 2012

Nancy at 17

This is Nancy at 17, just thought you'd like to see one of my favorite photos of mom.

Nancy grew up in a very small town in central Illinois. I'm pretty sure her extended family made up a large portion of the population. I have fond memories of visiting mom's hometown, most of mom's family were dairy farmers back then. I loved all of the farm cats and dogs and helping with chores. We didn't have time to sit around watching t.v. and there was no internet or gaming back then. Kids played outside when weather was good from dawn til dusk. When it was crummy out we would play board games or have a pretend beauty pagent. My brother was always the host and my sisters and I would take great pains in practicing for the talent portion. One of my favorite memories was when my sisters and I lip synced (and played pretend saxaphones) to Count Basie songs...let it roll Mr. Basie (one more time). If we said we were bored, the standard come back from my mother was "read a book", that's probably why I am an avid reader. Thanks mom~mpr


Posted by Picasa

Monday, March 5, 2012

Brownie Redo

Total success and worth remaking! I left out the Reese's pieces candy though... I don't care for them, and thought while it may add a texture element, they are too sweet. So glad that I remade them and didn't get upset about the first batch. I guess I was channeling grandma a little more than usual yesterday. Now I need to motivate myself to get back to knitting hat orders before I fall behind. I am going to try and make a lamb ear flap hat. -eem

Here's a tip...this recipe requires melting milk chocolate chips and then blending the chocolate with heavy cream.  Use electric mixer and if the result has a cottage cheese texture, add a little more heavy cream, 1 tablespoon will usually do the trick-mpr


Sunday, March 4, 2012

Brownies and naughty dogs

Izzy and Abe

Helping mom put together a tutorial for a pillowcase dress. The fabric she picked out will be similar to a familiar female mouse icon. It will hopefully replace the worn out dress my 3yr old little cousin refuses to take off. While helping my mother take notes and pictures, I battled her naughty dogs and left brownies in the oven at home for my husband to take out. Well, he fell asleep and luckily didn't burn down the house, but the brownies are so bad that even grandpa Chuck wouldn't eat them. Oh well, all in a day of lessons learned! Hopefully you will learn a more crafty lesson from our upcoming tutorial. Until then, I am off to fend off the naughty spaniels and remake the brownies when I get home, cause darn it, I was looking forward to them. HA! Here is a link to the brownies that I will remaking so you see why they are worth redoing. Enjoy! eem